It is easy to spend hundreds of dollars on a good quality pre-built rack. While some enclosures may be sold for more than a thousand bucks. This is precisely the reason why there are so many people building their own racks. I was the same person once: when offered an outrageous price for a simple enclosure. I decided to construct my very own DIY server rack using plywood and two-by-fours.
Not only did it take me just one weekend to do this. But it also gave me a lot more knowledge of my own server than any pre-made product would’ve. This tutorial describes all the factors, materials, and considerations required to make a truly durable home server rack. Rather than just an affordable one.
Planning Your DIY Home Server Rack Design
Before cutting any wood or ordering parts, a few upfront decisions shape the entire project. Getting these right early prevents expensive rework later.
Choosing Between Open Frame and Enclosed Designs
With an open frame rack, your components will be completely visible. Thus providing the greatest amount of ventilation and making changes to your cables easy. While closed rack systems look more organized and create less dust. They require active cooling in order to avoid creating heat inside the system. Open or semi-open frames would give the perfect combination for those who have home-based servers. Although floor-standing systems usually provide more ventilation. The only option when there is no room on the floor is the wall mount server rack, although they may not allow good ventilation or room for future expansion. It is important to leave about 20 percent of additional head room for future expansions.
Racks for homes tend to comfortably fit within the 6U to 20U bracket, depending on the number of devices that you have. For instance, a 20U rack would be tall enough to match the standing posture that would be convenient for a standing desk, and therefore, makes it easier to organize the cables. Before building, it is recommended that you draw a plan for your device layout, taking note of those devices that require regular accessibility. Devices that require regular accessibility such as the KVM switch and patch panel should be placed at an easily accessible position without crouching or opening the racks.
Sizing Your Rack for Current and Future Needs
The 19″ standard rack rails can fit most consumer-level and prosumer-level networking devices without requiring any adjustments. It is advisable that you purchase rails that are just a bit larger than your existing stack of devices.
Materials and Tools for Building a DIY Home Server Rack
Material choice affects both cost and long-term durability significantly. A few combinations show up repeatedly across successful builds for good reason.
Wood-Based Builds: Plywood and 2×4 Framing
Wooden plywood and 2×4 studs still constitute the most common materials used in such constructions due to affordability and strength that these two provide. This combination is quite heavy but much cheaper than metal structures. Wooden glue with screws makes the structure very strong after the correct assembling and securing. Adding some extra 2×4 studs on both sides, above and below will give additional strength to the structure. Pre-finishing the wooden parts prior to assembling will save you plenty of time and result in better-looking product.
First you should cut out your side pieces, then top and bottom panels and only after you can attach the rack rails. You can use aluminum window screen material to cover the open parts of the structure to filter some dust while not stopping air flow. Some people even make use of refrigerator’s box, stripping all the electrical wires and doors, creating very unique cabinet. Such construction can cost you virtually nothing if you already have this appliance in your possession.
Buying Rack Rails and Hardware Affordably
Rack rails, angle connectors, and mounting hardware often cost less than expected, especially through flight case suppliers rather than typical electronics retailers. Metal brackets, bolts, and nuts complete the structural connection between your frame and the actual rack rails. Shopping around between a few suppliers before committing to one source often reveals a meaningfully better price for identical hardware.
Cooling, Cable Management, and Power for Your Rack
Structure alone doesn’t make a server rack functional. Cooling, cabling, and power planning determine whether your build actually performs reliably over time.
Ventilation and Fan Placement
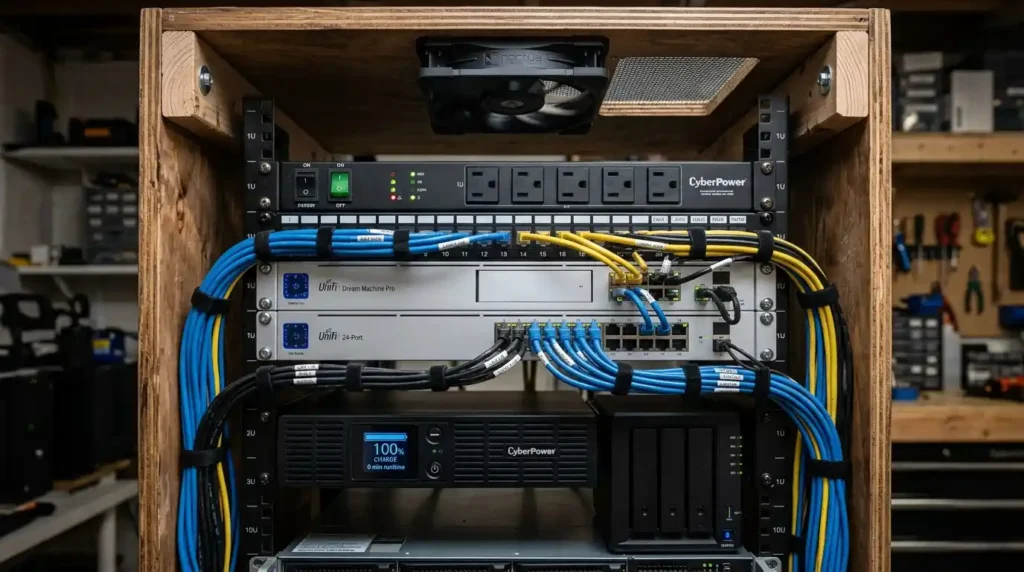
For loads below 500 watts, it is adequate to have one 120 mm fan placed at the top to exhaust the hot air. Make sure that the intake air flow is low down while the exhaust air flow is at the top, as heat rises. In case noise is an issue, then the stock fan could be replaced by a similar near silent fan. This will help in minimizing the noise levels while at the same time not limiting the air flow. Making sure that gaps in doors and panels are sealed will also help in reducing the noise level without minimizing air flow.
Cable Management and Power Distribution
Route cables along the sides rather than through the center, keeping equipment accessible and airflow unobstructed. A basic power distribution unit, paired with a UPS, protects equipment from outages and voltage spikes. Label cables as you go, since untangling an unmarked mess months later wastes far more time than labeling upfront. Velcro ties work better than zip ties for cable bundles, since they allow easy adjustments as your setup evolves over time. A little organization here pays off enormously the first time you need to troubleshoot a connection issue quickly.
Choosing Equipment for Your Home Server Rack
Once the physical structure is finished, equipment selection determines what your setup can actually do. Matching hardware to your goals prevents overspending on unnecessary power.
Budget-Friendly Server Hardware
Mini-ITX or micro-ATX systems with efficient processors, such as the Intel N100 or N305 processor, will get the job done at home while not consuming too much electricity. The enterprise-class Xeon processors, which are second-hand, have higher processing capabilities, but consume higher amounts of electrical power. Using ECC memory ensures data protection, especially if you want to keep your own applications running all day long. Getting second-hand enterprise-level hardware through a reseller is usually cheaper than consumer-grade systems, although they tend to be noisier and less efficient.
Popular Self-Hosted Applications
Homelabs will often have services running such as Nextcloud to store files, Home Assistant for automation, or Vaultwarden for password management. Another service that is widely used is the media server, which allows you to stream your own content library rather than subscribe services.
Conclusion
The creation of your own home server rack will definitely reward you with real savings and the design which will be completely suited to your needs. First of all, you need to make a good plan, pick up material according to your budget and abilities, and pay great attention to the ventilation and wire management right from the very beginning.
Frequently Asked Questions
How much could I possibly save by constructing my own rack compared to purchasing a commercial model?
The average cost of building materials for many individuals is below $200, in contrast to several hundred dollars for an enclosed cabinet of equivalent capacity.
What height should my rack be for home servers?
The ideal rack height varies depending on current hardware, but 6U to 20U is considered sufficient space for future development.
Are there any special tools required for building a wooden server rack?
Not really; all that is needed is the usual set of tools – saw, drill, screwdriver and measuring tape.
How will my rack not overheat when using my own design?
The inclusion of at least one exhaust fan and ensuring proper intake at the lower part of the case is enough.